


Description
8 Photo Sizes Fabric Cover Mat Board Cardboard Picture Frame Patterns
34 pages
26 pages of true to size patterns, for board, fabric panels, & Ultrahold patterns
5 pages of photo & text, step by step instructions
Make fabric covered picture frames, covering mat board or cardboard with fabric, and Ultrahold, a paper back, iron on, fabric adhesive, sold at AC Moore, Michaels, Walmart, Joann Fabrics, and online, in 1 yard & 5 yard rolls. It is acid free / photo safe, great for photos! Re-use the paper backing for ironing purposes. Oh, AND ...you can print the Ultrahold patterns directly to Ultrahold, by Therm o Web HeatnBond, manufactured by http://thermowebonline.com, print using your inkjet printer! Just cut 32 letter size, 8 1/2" x 11" pieces from a 5 yard roll, using a ruler, pen or pencil, and paper trimmer / scissors! You can even use it to iron fabric to the front of the U shaped board spacers. You'll need 2 to 3 rolls to do all of the frames.
Please do one frame size at a time. Use your printer properties window, find the corresponding page, and print page _ to page _, one page at a time. Each frame takes about 1-3 hours, depending on your speed, and prep of getting things together ahead of time. About 1 1/2 hours prep & craft time.
You can try wood, or ceramic, or metal, instead of mat board or cardboard, if you want, or just use the mat board or cardboard alone, paint them, spray them with chalkboard paint, decoupage them, cover them with vinyl, or leather. My suggestion would be to make a felt pattern from the strut leg pattern provided, and hot glue or iron Ultrahold to the back and iron it to the back of the 2 part strut leg, leaving a space, lines provided on pattern, for the strut leg to bend, and then attach the top of the strut leg to the easel back with strong glue, like E6000, which holds marble to mat board (used for my interior design presentation boards, and you'd have to pick the marble or granite or wood sample off with a screwdriver to get it off). Then apply some ribbon between the bottom right corners of both the easel back & bottom strut leg board, connecting them, parts aligned, of course.
These frames are great for:
photos
display artwork
poems
invitations
display signs for retail stores / trade shows
table number display signs
name place cards / party favors / weddings / showers / events
brooch holding or earring holding frame
2 smallest frames can convert or be used as ornaments for the holidays, and convert to brooch pins / name badges, with a removable / interchangeable strut leg, attached by Velcro / hook & loop, and metal 1 1/4" long bar style brooch pin back, held in place through 2 holes on easel back panel, hole punched, or awled
There is an opening large enough to get your fingers in to retrieve the photo and its protective sleeve, a clear, acid free, sheet protector page, cut to the size of the photo, sold in packs of 50 pages at Walgreens, Walmart, & Target for under $6, used in lieu of glass. The strut leg bends, to pitch and stand, as a tabletop frame, with the strut leg panel, that has its spacer removed, lines to cut away provided on pattern to iron the Ultrahold fused / ironed fabric panels together in the "gully" or space, on both sides of the strut leg. It gets connected to the covered easel back, bottom right corners aligned, connecting them with ribbon, between layers of fabric / Ultrahold iron on and board. You can hot glue then staple the top of the strut leg, covered on both sides, bendable, to the covered easel back board. Their is a "u shaped" piece of board, 3 pieces / strips of board, pattern provided, covered on the outer edge and glued down to the sides not showing. There are 2 holes on the top and left, centered, to hole punch, for hanging the frame on the wall, or thread ribbon through the holes to hang on the wall.
I created the fabric covered mat board frame, when I found that the ones on the market were made horribly. I worked in a department store, and when I was stationed in stationery, one of my tasks was to "try" and get the frames neatly back into their boxes - good luck! lol The glass would be broken. They were cheaply made, the inner corners of the front of the frame never seemed like they were finished neatly enough, with fraying fabric inner corners, turn buttons were always falling off or popped off, on the back, holding the easel back & strut leg combo, they call them easel backs in the industry. I was watch a craft show on HGTV, and the host was making a fabric covered wood frame, and I thought, "I could make that better!" However, I didn't know how to work with wood, nor did I have woodworking tools - but, I worked with illustration board, and mat board! So, I started playing around with that, fabric, and hot glue, and found out about what Ultrahold did.
At first, I splurged and bought a hinge and hanger press. By 2005, I discovered and invented a way on how to make the fabric & Ultrahold covered mat board frames, without the hinges and hangers, and press! Soon after I invented these, and the patterns after, my press broke, with a screw breaking on me. By that time, I had figure out how to make the frames with just the 4 "ingredients", fabric, mat board, Ultrahold, & ribbon, and they could all be bought from a craft store!
And all the supplies can be found in a craft store:
- fabric
- Ultrahold - 5 yard roll yields 2 frames for 8x10" photo, or 32 of the 2 smallest size frames - buy 2 to 3 five yard rolls, on sale with coupon
- ribbon
- mat board or cardboard 1/16" thick, 32 x 40", 20x30" - mat board sold at AC Moore, Michaels, online, Utrecht, Dick Blick, Joann Fabric super stores, frame shops
- clear, ACID FREE, sheet protector pages, for protective photo sleeves, sold at Walgreens, Walmart, & Target, cut to size of photo using paper trimmer and straight pins or tape to mark - package labeled "acid free" - one page yields 10 sleeves for 2x3" photo, sold in 50 and 100 page packs, under $6 for 50 pages
plus 2, up to 10 sticks of hot glue, depending on frame size, a low temp glue gun, iron, I use a mini iron, but if you're careul, a regular iron will do, I use a utility knife, the kind electrician use, to cut the mat board. You can try an Exacto knife or craft knife, if you cut the panels for the 7 largest sizes down to a manageable 8x10" size, you can use a paper trimmer to cut the mat board or cardboard, pen or pencil, scissor, fabric scissors, I also use embroidery scissors to get into the inner corners and snip away at corners, Fiskars makes a non-stick pair, great for mixed media crafts, I have a self healing mat, but any surface that you can protect with craft paper, or freezer paper is good to protect your work surface, like a dining room table - like mine lol.
Frame patterns for 8 photo sizes included:
- 1 1/2" x 2 1/2" - kids school photos / charm photos
- 2x3" - for instant print photos from Instax Mini & Polaroid cameras, & smartphone portable photo printer devices on market - great for wedding / shower / event favors and place card frames
- 2 1/2" x 3 1/2" - wallet size
- 4x6" - 2 sizes, 5x7" & 7x9"
- 5x7" - 2 sizes, 6 3/4" 8 3/4" & 8x10"
- 8x10" - 10x12" size frame - needs 2 sheets printed per panel, for 3 out of 4 panels, patterns included
Can print 26 pattern pages onto paper, for 4 panel part to transfer to mat board or cardboard, for covered board patterns
Can re-print 26 pattern pages,to use for cutting fabric panels out, seam allowances in gray on sides of white board patterns, print pattern pages onto Ultrahold, cut away gray seam allowance flaps on outer side edges, and use for ironing to fabric, to cover backside of each of the board panels, to cover over seams glued down onto back of boards, to give a finished look
You can mirror, or flip horizontally, re-print the paper patterns, including seam allowance gray flaps, and transfer to Ultrahold, iron to back of fabric, and iron to board - the Ultrahold is adhesive, and you can use the tip of your iron, to iron into the inner corners and edges, for a smooth, crisp, finished look - reuse the paper backing as a buffer between your iron and the Ultrahold / fabric.
For making wood frames, metal frames, or ceramic / clay frames, wallpaper covered, vinyl covered, paper / decoupage covered, or even fabric covered mat board or cardboard frames, for the strut leg to be bendable, allowing the frame to be tabletop, to stand on a table or shelf, an alternative to finishing the strut leg's back side, I would suggest that you cut a piece of felt the full size of the strut leg pattern, and hot glue / adhere to the top & bottom, front covered strut leg parts, in lieu of a fabric & Ultrahold fused backing cover. That way, when you cover the top and bottom parts of the strut leg, removing the spacer, the felt will act like a hinge as well as a backing panel to finish the bendable strut leg.
4 panel parts to cover with fabric:
- Frame front border or FFB - front of frame - center cut out, covers 1/4" to 1/2" of outer edge of photo
- U - shaped board - 3 strips to cut and connect with hot glue, used as spacer between frame front border / FFB, and easel back panel
- Easel back - EB - back of frame, with strut leg connected to it
- strut leg - easel strut leg - easel leg - leg that pitches and allows frame to stand - cut as one piece, then remove spacer, cut along lines provided, but keep to space 2 parts, cover with fabric, remove spacer, iron fabric & Ultrahold to both sides, iron in gully or spacerr, for strut leg to bend
Invented & copyright protected by me, Kristie Hubler, copyright 2005. All Rights Reserved. Not for resale. For personal use only. To license pattern or re-sell frame as a product, please contact Kristie at fabricatedframescom@gmail.com at http://fabricatedframes.com for royalty rates, contract, and cost.
Thank you!
Kristie
http://teacherspayteachers.com/store/fabricated-frames
8 Photo Sizes Fabric Covered Mat Board Cardboard Picture Frame Patterns Bundle
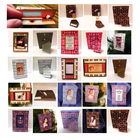

Highlights


Description
8 Photo Sizes Fabric Cover Mat Board Cardboard Picture Frame Patterns
34 pages
26 pages of true to size patterns, for board, fabric panels, & Ultrahold patterns
5 pages of photo & text, step by step instructions
Make fabric covered picture frames, covering mat board or cardboard with fabric, and Ultrahold, a paper back, iron on, fabric adhesive, sold at AC Moore, Michaels, Walmart, Joann Fabrics, and online, in 1 yard & 5 yard rolls. It is acid free / photo safe, great for photos! Re-use the paper backing for ironing purposes. Oh, AND ...you can print the Ultrahold patterns directly to Ultrahold, by Therm o Web HeatnBond, manufactured by http://thermowebonline.com, print using your inkjet printer! Just cut 32 letter size, 8 1/2" x 11" pieces from a 5 yard roll, using a ruler, pen or pencil, and paper trimmer / scissors! You can even use it to iron fabric to the front of the U shaped board spacers. You'll need 2 to 3 rolls to do all of the frames.
Please do one frame size at a time. Use your printer properties window, find the corresponding page, and print page _ to page _, one page at a time. Each frame takes about 1-3 hours, depending on your speed, and prep of getting things together ahead of time. About 1 1/2 hours prep & craft time.
You can try wood, or ceramic, or metal, instead of mat board or cardboard, if you want, or just use the mat board or cardboard alone, paint them, spray them with chalkboard paint, decoupage them, cover them with vinyl, or leather. My suggestion would be to make a felt pattern from the strut leg pattern provided, and hot glue or iron Ultrahold to the back and iron it to the back of the 2 part strut leg, leaving a space, lines provided on pattern, for the strut leg to bend, and then attach the top of the strut leg to the easel back with strong glue, like E6000, which holds marble to mat board (used for my interior design presentation boards, and you'd have to pick the marble or granite or wood sample off with a screwdriver to get it off). Then apply some ribbon between the bottom right corners of both the easel back & bottom strut leg board, connecting them, parts aligned, of course.
These frames are great for:
photos
display artwork
poems
invitations
display signs for retail stores / trade shows
table number display signs
name place cards / party favors / weddings / showers / events
brooch holding or earring holding frame
2 smallest frames can convert or be used as ornaments for the holidays, and convert to brooch pins / name badges, with a removable / interchangeable strut leg, attached by Velcro / hook & loop, and metal 1 1/4" long bar style brooch pin back, held in place through 2 holes on easel back panel, hole punched, or awled
There is an opening large enough to get your fingers in to retrieve the photo and its protective sleeve, a clear, acid free, sheet protector page, cut to the size of the photo, sold in packs of 50 pages at Walgreens, Walmart, & Target for under $6, used in lieu of glass. The strut leg bends, to pitch and stand, as a tabletop frame, with the strut leg panel, that has its spacer removed, lines to cut away provided on pattern to iron the Ultrahold fused / ironed fabric panels together in the "gully" or space, on both sides of the strut leg. It gets connected to the covered easel back, bottom right corners aligned, connecting them with ribbon, between layers of fabric / Ultrahold iron on and board. You can hot glue then staple the top of the strut leg, covered on both sides, bendable, to the covered easel back board. Their is a "u shaped" piece of board, 3 pieces / strips of board, pattern provided, covered on the outer edge and glued down to the sides not showing. There are 2 holes on the top and left, centered, to hole punch, for hanging the frame on the wall, or thread ribbon through the holes to hang on the wall.
I created the fabric covered mat board frame, when I found that the ones on the market were made horribly. I worked in a department store, and when I was stationed in stationery, one of my tasks was to "try" and get the frames neatly back into their boxes - good luck! lol The glass would be broken. They were cheaply made, the inner corners of the front of the frame never seemed like they were finished neatly enough, with fraying fabric inner corners, turn buttons were always falling off or popped off, on the back, holding the easel back & strut leg combo, they call them easel backs in the industry. I was watch a craft show on HGTV, and the host was making a fabric covered wood frame, and I thought, "I could make that better!" However, I didn't know how to work with wood, nor did I have woodworking tools - but, I worked with illustration board, and mat board! So, I started playing around with that, fabric, and hot glue, and found out about what Ultrahold did.
At first, I splurged and bought a hinge and hanger press. By 2005, I discovered and invented a way on how to make the fabric & Ultrahold covered mat board frames, without the hinges and hangers, and press! Soon after I invented these, and the patterns after, my press broke, with a screw breaking on me. By that time, I had figure out how to make the frames with just the 4 "ingredients", fabric, mat board, Ultrahold, & ribbon, and they could all be bought from a craft store!
And all the supplies can be found in a craft store:
- fabric
- Ultrahold - 5 yard roll yields 2 frames for 8x10" photo, or 32 of the 2 smallest size frames - buy 2 to 3 five yard rolls, on sale with coupon
- ribbon
- mat board or cardboard 1/16" thick, 32 x 40", 20x30" - mat board sold at AC Moore, Michaels, online, Utrecht, Dick Blick, Joann Fabric super stores, frame shops
- clear, ACID FREE, sheet protector pages, for protective photo sleeves, sold at Walgreens, Walmart, & Target, cut to size of photo using paper trimmer and straight pins or tape to mark - package labeled "acid free" - one page yields 10 sleeves for 2x3" photo, sold in 50 and 100 page packs, under $6 for 50 pages
plus 2, up to 10 sticks of hot glue, depending on frame size, a low temp glue gun, iron, I use a mini iron, but if you're careul, a regular iron will do, I use a utility knife, the kind electrician use, to cut the mat board. You can try an Exacto knife or craft knife, if you cut the panels for the 7 largest sizes down to a manageable 8x10" size, you can use a paper trimmer to cut the mat board or cardboard, pen or pencil, scissor, fabric scissors, I also use embroidery scissors to get into the inner corners and snip away at corners, Fiskars makes a non-stick pair, great for mixed media crafts, I have a self healing mat, but any surface that you can protect with craft paper, or freezer paper is good to protect your work surface, like a dining room table - like mine lol.
Frame patterns for 8 photo sizes included:
- 1 1/2" x 2 1/2" - kids school photos / charm photos
- 2x3" - for instant print photos from Instax Mini & Polaroid cameras, & smartphone portable photo printer devices on market - great for wedding / shower / event favors and place card frames
- 2 1/2" x 3 1/2" - wallet size
- 4x6" - 2 sizes, 5x7" & 7x9"
- 5x7" - 2 sizes, 6 3/4" 8 3/4" & 8x10"
- 8x10" - 10x12" size frame - needs 2 sheets printed per panel, for 3 out of 4 panels, patterns included
Can print 26 pattern pages onto paper, for 4 panel part to transfer to mat board or cardboard, for covered board patterns
Can re-print 26 pattern pages,to use for cutting fabric panels out, seam allowances in gray on sides of white board patterns, print pattern pages onto Ultrahold, cut away gray seam allowance flaps on outer side edges, and use for ironing to fabric, to cover backside of each of the board panels, to cover over seams glued down onto back of boards, to give a finished look
You can mirror, or flip horizontally, re-print the paper patterns, including seam allowance gray flaps, and transfer to Ultrahold, iron to back of fabric, and iron to board - the Ultrahold is adhesive, and you can use the tip of your iron, to iron into the inner corners and edges, for a smooth, crisp, finished look - reuse the paper backing as a buffer between your iron and the Ultrahold / fabric.
For making wood frames, metal frames, or ceramic / clay frames, wallpaper covered, vinyl covered, paper / decoupage covered, or even fabric covered mat board or cardboard frames, for the strut leg to be bendable, allowing the frame to be tabletop, to stand on a table or shelf, an alternative to finishing the strut leg's back side, I would suggest that you cut a piece of felt the full size of the strut leg pattern, and hot glue / adhere to the top & bottom, front covered strut leg parts, in lieu of a fabric & Ultrahold fused backing cover. That way, when you cover the top and bottom parts of the strut leg, removing the spacer, the felt will act like a hinge as well as a backing panel to finish the bendable strut leg.
4 panel parts to cover with fabric:
- Frame front border or FFB - front of frame - center cut out, covers 1/4" to 1/2" of outer edge of photo
- U - shaped board - 3 strips to cut and connect with hot glue, used as spacer between frame front border / FFB, and easel back panel
- Easel back - EB - back of frame, with strut leg connected to it
- strut leg - easel strut leg - easel leg - leg that pitches and allows frame to stand - cut as one piece, then remove spacer, cut along lines provided, but keep to space 2 parts, cover with fabric, remove spacer, iron fabric & Ultrahold to both sides, iron in gully or spacerr, for strut leg to bend
Invented & copyright protected by me, Kristie Hubler, copyright 2005. All Rights Reserved. Not for resale. For personal use only. To license pattern or re-sell frame as a product, please contact Kristie at fabricatedframescom@gmail.com at http://fabricatedframes.com for royalty rates, contract, and cost.
Thank you!
Kristie
http://teacherspayteachers.com/store/fabricated-frames
